
How to create a task
Any web dashboard user can create a task manually: for themselves, a colleague or several employees at once. Assignees get a push notification “You have been assigned a task”.
Step by step
-
Open the create window. In Work → Tasks, click New task (or press N).
-
Enter a name. The name is required, at least 2 characters. Below it is the description: what to do and how to tell it's done.
-
Fill in the properties. Under the description are property buttons: status, priority, assignees, due date, location, tags and watchers. Everything except the name is optional.
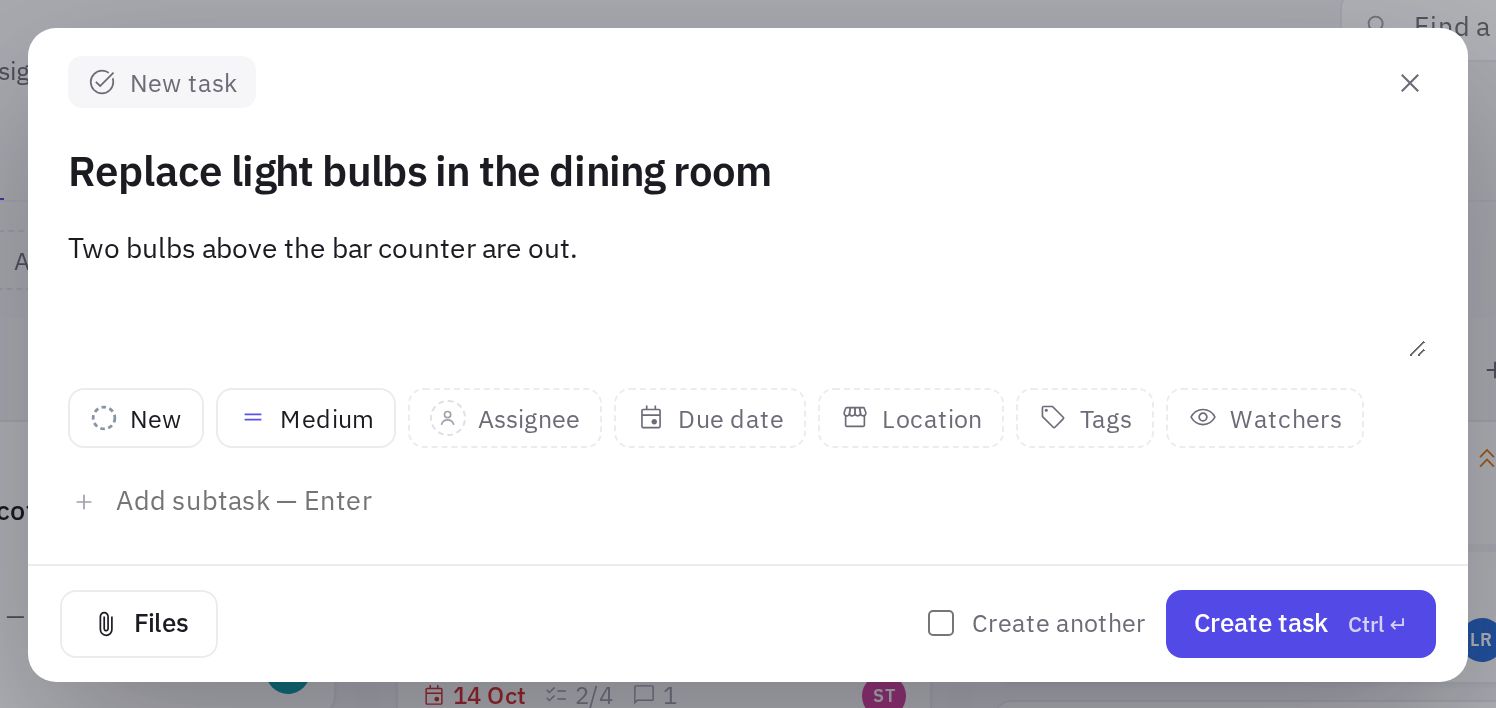
The New task window: title, description and property buttons -
Add subtasks. Type an item in the Add subtask — Enter field and press Enter. This is a handy way to break work into steps.
-
Attach files. Use the Files button at the bottom of the window or drag files into the window.
-
Create the task. Click Create task or press Ctrl + Enter. The task opens in a card on the right.
Need to create several similar tasks in a row? Tick Create another next to the button: the window stays open, and the status, assignees, location and due date are kept for the next task.
Task properties
| Property | What it means |
|---|---|
| Status | New, In progress, In review, Done, Rejected. Default — “New” |
| Priority | Urgent, High, Medium, Low. Default — “Medium” |
| Assignees | One or more company employees (up to 20) |
| Due date | The day by which the task should be done |
| Location | The location the task relates to |
| Tags | Your own words for grouping: “Kitchen”, “Sanitation”, etc. Pick from suggestions or create a new one (up to 10 per task) |
| Watchers | People who follow the task without doing it |
For more on statuses and working with the task card, see Task statuses, assignees and history.
Which files you can attach
Up to 10 files at a time, each up to 20 MB: photos (JPG, PNG, GIF, WEBP, HEIC), PDF, Word and Excel documents, CSV, TXT, ZIP and MP4 or MOV videos.
Quick ways to add a task
- In the list — the + button in a group header. Type a name and press Enter: the task gets that group's status, priority, assignee, location or due date. Esc cancels.
- On the board — the + button in a column header opens the create window with that status.
- In the calendar — the + button in a day cell, or a double-click on a day, opens the create window with that due date.
- On the “Assigned to me” tab, a new task is assigned to you right away.
- With the AI assistant — ask in the chat, for example: “Create a task for the chef at Abay 10 to replace the thermometer by Friday”. The assistant shows a draft, and the task is created after you click Create. Learn more in AI assistant.
Duplicating and deleting a task
In the task card, click More (three dots):
- Duplicate — creates a copy with the same description, priority, people, location, due date, tags and subtasks (subtasks are unchecked). “(copy)” is added to the name.
- Delete — available to the task author and company administrators.
Frequently asked questions
Can I assign a task to several people at once?
Yes, you can select several employees in the Assignees property. Each of them gets a notification.
Tasks should appear on their own after an audit — do I need to create them manually?
No. Violation tasks are created automatically if this is set up in Automation or in the “Auto task” setting of a checklist question.
Will I get a notification if I assign a task to myself?
No, the “You have been assigned a task” notification only goes to other assignees.
Thank you! This helps us improve the help center.