
How to add an employee and send an invitation
Employees are added by an administrator in Management → Users. A new employee gets an email with a login and password — they use them to sign in to the jeCheck mobile app and, if access is enabled, to the web dashboard.
How to create a user
-
Open the section. In the menu, go to Management → Users, Employees tab.
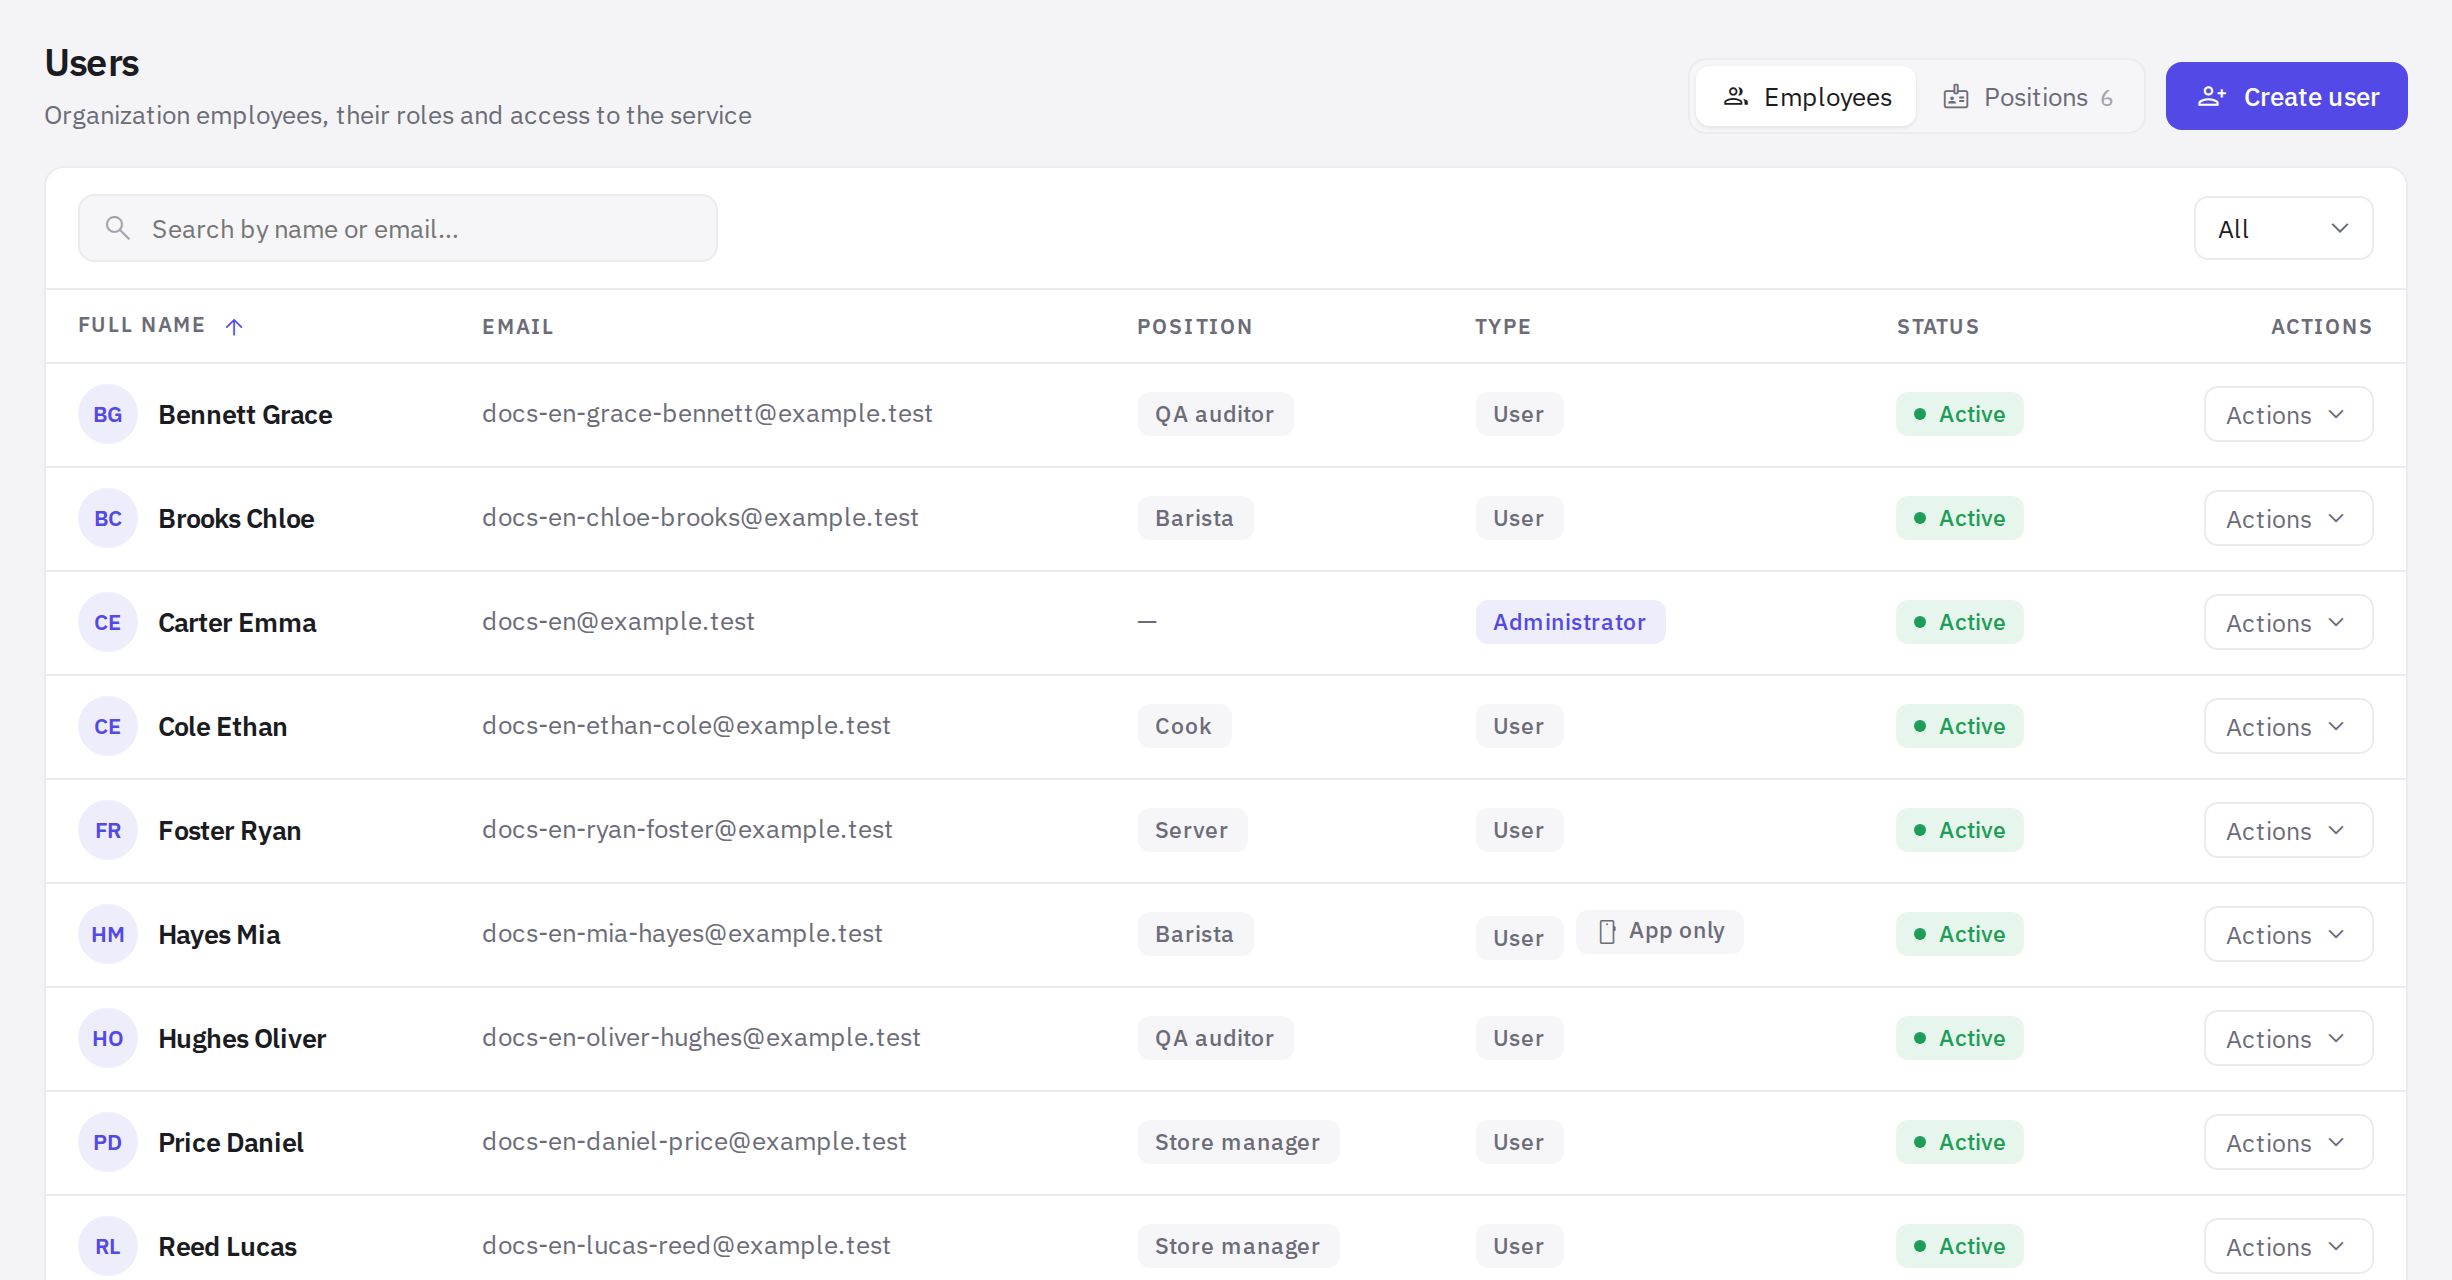
The employee list in the Users section -
Click “Create user”. A window with a form opens.
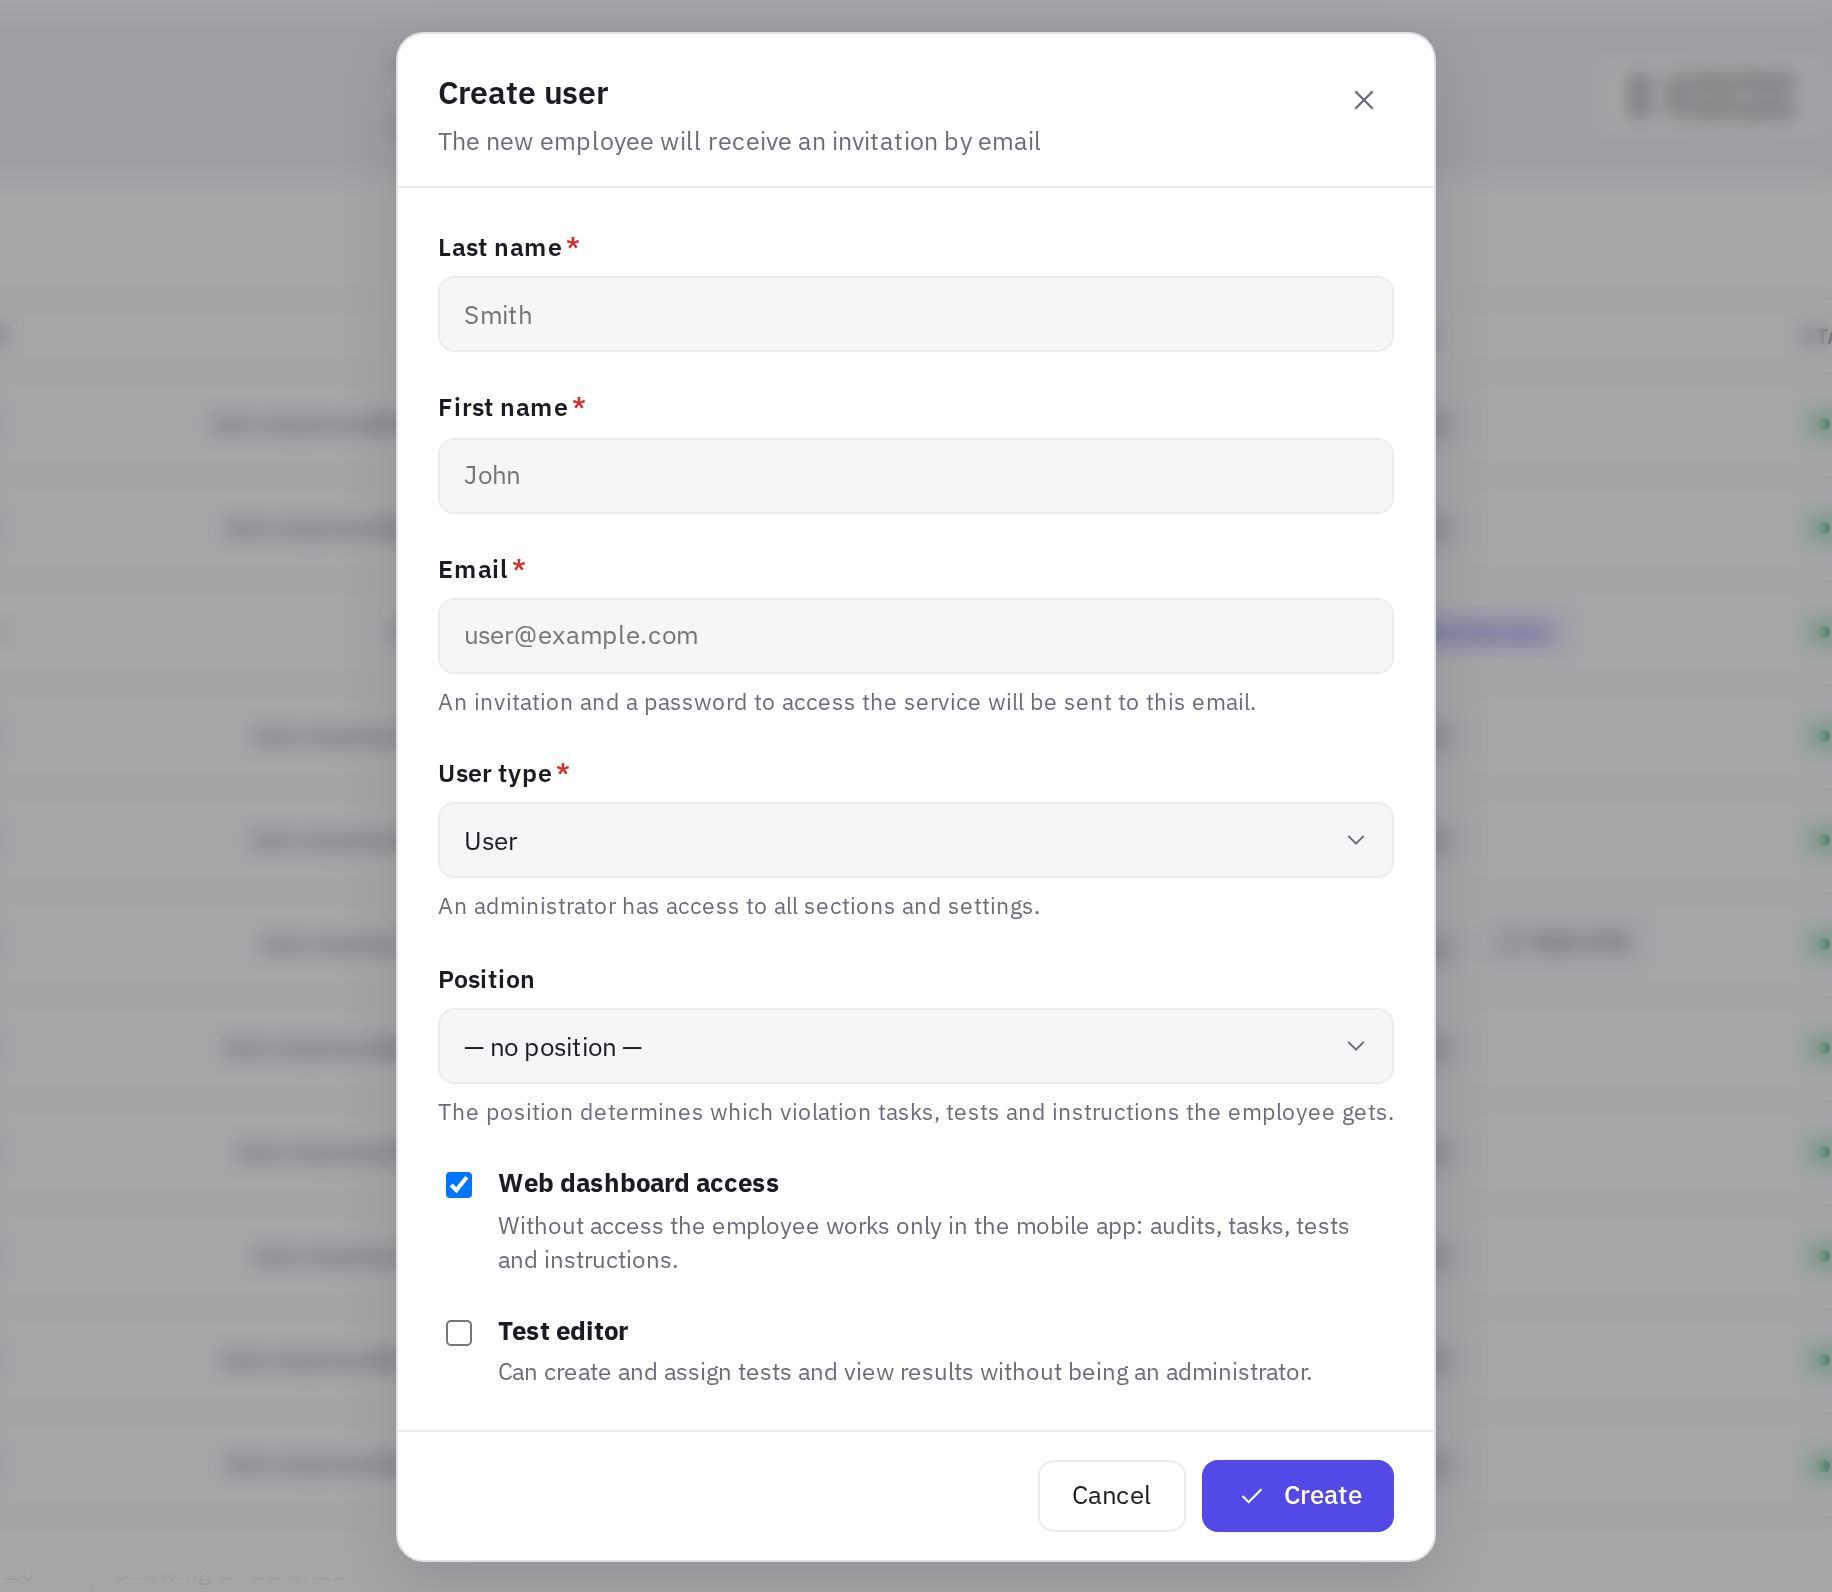
The Create user window -
Fill in the required fields. Last name and First name (at least 2 characters each) and Email — the invitation is sent there. The email must be unique: an address already used in jeCheck won't work.
-
Choose the user type. User is a regular employee, Administrator has access to all sections and settings. More in /docs/team/roles-and-positions.
-
Set the position. Pick it from the list or leave “— no position —”. If the list is empty, first create positions on the Positions tab.
-
Set up access. The Web dashboard access checkbox is on by default. Clear it if the employee will work only in the app — see /docs/team/web-access. The Test editor checkbox lets the employee create and assign tests without administrator rights.
-
Click “Create”. The employee appears in the list and receives an invitation email.
After that, add the employee to their location's team — see /docs/team/locations.
What the employee receives
jeCheck generates the password itself and emails it together with the login (the email address).
- An employee with web dashboard access gets an invitation with a sign-in link.
- An employee in “App only” mode gets an email with links to the mobile app instead of a link to the website.
Employees can change the password to their own in their Profile in the web dashboard — see /docs/account/profile.
How to edit an employee's details
Click the employee's name in the table or choose Actions → Edit. You can change the last name, first name, email, type, position and the access checkboxes.
How to change an employee's email
The email is the employee's login, and only a company administrator can change it.
- Open the employee card. Click the employee's name or choose Actions → Edit.
- Enter the new address in the Email field and click Save.
What happens after the change:
- the employee can sign in to the web dashboard and the mobile app only with the new address, the password stays the same;
- an email “Your jeCheck login has been changed” with the new and old login is sent to the new address;
- the employee doesn't need to confirm the new address, and open sessions in the app are not interrupted.
The address must be unique across jeCheck: if another account already uses it, you'll see an error. If the employee doesn't remember the password, choose Actions → Reset password — the new one will go to the new address.
Resending the invitation and resetting the password
Both commands are in the Actions menu in the employee's row.
- Send invitation — the employee gets the email with a sign-in link and a new password again. Useful if the first email got lost.
- Reset password — jeCheck generates a new password and emails it to the employee.
In both cases the old password stops working — on the website and in the app, and the app on all the employee's devices will ask them to sign in again. Tell the employee to sign in with the password from the new email.
Deleting and restoring
- Delete. Choose Actions → Delete and confirm. The employee loses access immediately: the app on their devices stops working, sign-in on the website is refused, and an open web dashboard closes on their next action. Their status in the table is Deleted.
- Restore. Find the employee with the Deleted filter and choose Actions → Restore — access is restored. The employee will need to sign in to the app again.
Searching the list
Above the table there is a search by name or email and the All / Active / Deleted filter. Click the Full name and Email column headers to sort. In the Type column, employees without web dashboard access are marked App only.
Frequently asked questions
The employee didn't get the email. What should I do?
Ask them to check their spam folder. If the email isn't there, choose Actions → Send invitation — a new email with a new password will be sent.
The employee changed their email. How do I move their account?
You don't need to create a new user — open the employee card and change the Email (see “How to change an employee's email”). Their audit history, tasks, tests and location assignments are kept.
Can I create an employee without an email?
No. The email is required: it's the employee's login, and the password is sent to it.
How many users can I add?
As many as you like, on any plan.
Does the employee need to confirm their email?
No. The address was entered by an administrator, and the password is sent only in the invitation to that address, so the email of an employee added in Management → Users counts as confirmed — sections open right after sign-in. Only the person who registered the company has to confirm their email (see /docs/getting-started/registration).
Thank you! This helps us improve the help center.